
You are currently browsing the category archive for the ‘Crochet’ category.

Yes, my dears. That up there, looking so familiar, is the crocheted version of the Baby Surprise Jacket. I did it. The entire credit goes to James G Davis (Pandaman) who worked out a stockinette version, upon which mine is totally based. The stockinette gauge is closer to the sc gauge than garter, so Mr Davis’ version was perfect for this. I don’t know why I didn’t do it this way the first time. All I had to do was use sc for every stitch and decide how I wanted to make my increases and decreases. I chose to increase by doing 2 sc in two stitches (an increase of 2), and my decreases by sc3tog (hook through next stitch, yo, pull loop through 3 times, yo and pull loop through all 4 loops on hook). Next time I might change my increases to 3 sc in one stitch. And use some interesting colours instead of this pale pink.
I don’t know why, but I always seem to gravitate towards the same colours for babies. Sigh. It could also be that these are the only colours there are, so it’s not as if I’m faced with a wide choice, not if I don’t want to produce glow-in-the-dark baby clothes. Which I don’t.
Here are the particulars (here’s my Ravelry page):
Yarn: Standard issue baby acrylic, about 150gm or so.
Hook: Size 5.00mm (US H). I went up a size or two from my first attempt, in order to conquer the obvious gauge problem. I made a conscious effort to make the starting chain loose (mine usually tends to be tight) and was immediately rewarded by a gratifyingly right-angled beginning.
Pattern: Elizabeth Zimmermann’s Baby Surprise Jacket (link to knitwiki article), aided and abetted by Pandaman’s Stockinette modifications.
Time: I began my first attempt a while ago, as you will remember, and actually started this one a few days ago. Then I got caught up in testing a couple of patterns, doing some work (my job) and distracted by other things, so the project languished a bit. I finally told myself off and picked it up again and resolved not to be distracted this time. The endless rows of sc do begin to pall after a while, which sort of explains why I’d like to do it in a different sort of yarn the next time. And when I grow up, I’d like to try manipulating the gauge for other stitches, starting with dc perhaps. A couple of evenings to finish this normally.
Size: 22″ around.
Extra #1 What can I say? It’s a bit anti-climactic, realising the solution was easy after all, I just had been overthinking things a bit.
#2 I must have counted every stitch on every inc/dec row. I didn’t use markers (because I find stitch markers in crochet to be tedious) and spreading the increases out over 2 stitches made it a bit more tiresome than it needed to be. I don’t know why, when I’d been sc3tog-ing for a decrease, it didn’t occur to me to do 3sc in 1 for an increase! I was fooled by the knitting, where it’s usual to only increase one stitch at a time (unless you’re yo-ing or casting on, and end up with holes). Took me until I was writing down my notes to realise it doesn’t have to be that way, crochet is so much more flexible in that sense.
#3 I added some length to the sleeves after finishing the main part, because they were looking really stubby. I went to the edges and did a few rows of sc on the other side of the starting chain, then decreased stitches twice before ending off.
#4 Not entirely happy with the collar (it could still be added to, but I don’t think I will).
#5 There isn’t a girl baby in sight who’d require warm clothing, but I do have one earlier victim who’s a bit small despite being a year old. She’ll do.
I’m not resting on my laurels, having begun two other projects-one of them is yet again a baby sweater, and the other a dishcloth. And yes, I’ll name them among my FOs. That’s for Sara. If I didn’t count my small projects, I’d have no projects at all.

Even as a child I was a jealous and capricious pest. And that hasn’t altered one bit with passing years. So naturally when I saw that some of my friends had got together to make some lovely pineapple soap sachets, I had to make one too. I had this soap from Ruth lying around, but it was round, so I searched for and found a round pattern. Used some scraps of thread and a satin ribbon, and hey presto…Even if it isn’t as pretty as the ones my friends made. Unfortunately that’s a lesson that I never learned, that imitation is possible, but not always successful.
Here you go.


I am deliberately posting small pictures so you won’t see the wonkiness. Aren’t I clever?
And the specs. My Ravelry page is here.
Thread: Apna Anchor size 20
Hook: Pony handled steel hook 1.00mm. This is fast becoming my favourite thread hook.
Pattern: Round Soap Sachet by Priscilla Hewitt.
Time: A couple of hours. Seriously.
Size: 3″across
Extra #1 Nothing much. I’ve said it all.

I’ve been busy over the past couple of days trying to fulfill a dream wish of mine. Converting the Baby Surprise Jacket to crochet. For my first attempt, I did a plain stitch for stitch translation from knit to crochet, replacing knit with single crochet.
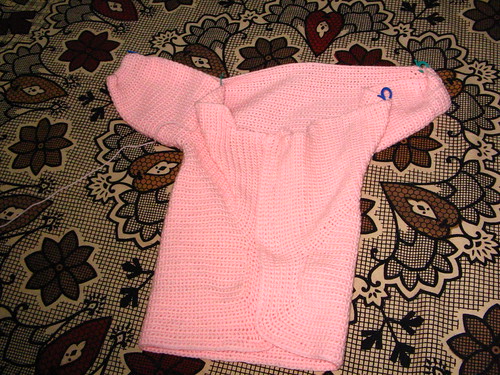
Quite early on I saw there was a problem, but I persisted and finished the piece. I’ve tried to pull it into shape, but as you can see, there are some problems. It appears the piece is too long and not wide enough.

Obviously I shall have to rip it back, and redo it. It will involve some thinking. Namely, I need to make it such that the width of the two fronts equals the back (cast-on edge) minus the sleeve lengths (allowing for the button bands, of course). Also perhaps reduce the length of the back a bit so the fronts are squarer.
Something tells me that dreaded thing, a swatch, is imminent. Oh dear.
Or first cousins perhaps. There is a Doilie-along over at Ravelry for the Doilie Heads group, and I decided to join because I’ve never knit a doily before. I’m happy to say it wasn’t as difficult as I thought it would be! Here are my results. First, the crochet version (although I did it second).

And the details:
Thread: Aunt Lydia’s Classic Crochet (size 10) in Victory Red. The colour’s much richer in real life, not the washed-out version of my camera. I’ve never felt constrained to use only white for doilies, I don’t know why. It seems limiting somehow, my skills, resources and abilities are limited enough already without adding colour restrictions to the constraints. Here is my Ravelry page for the project.
I quite liked the feel of the thread, although it isn’t shiny like the Anchor and Red Heart we get here, it’s soft. Slightly fuzzy though, and might not stand up to rough use (will pill).
Hook: Pony handled steel hook 1.75mm
Pattern: Antlia from Patrizia Pisani (CrochetPatty of Patty’s Filet and Crocheting Page). She has lovely patterns, I don’t know why I haven’t done more of them. Although I suspect I might have done the odd one before my blogging days. Alas, no photographic evidence exists. I wrote too soon. There is one other project I have evidence of. I think I made it while we were living in Bombay, so it’s at least 4 years old. I might have given it away too.
Time: Two days
Size: 12″
Extra #1 Compared to the knit version, this isn’t as elegant and delicate as I’d like, but then I suppose that’s what you get with size 10 thread. Makes the point that with the same fibre, knit is always finer (unless you want to make holey and too-loose crochet). Quick and easy, though. Badly blocked as usual.
#2 There is what appears to be one error in the instructions. Replace the ‘dc’ in the final row with ‘sc’ and it works.
#3 No specific picot version is given in the pattern, so I did a ch 3, slip st in first ch.
Now for the knit version.

Thread: Same as above. I wanted to make the material same, to emphasise the difference between the two techniques. Point made, I think.
Someone suggested I should use wool, but the thread gave me some familiarity. I do have some laceweight wool, but it terrifies me.
Needles: Unknown metal US 1/2.25mm needles (my only set of 5 given to me by Heide). I was afraid I didn’t have the right size of needles for this project, and would have much preferred using a circular, perhaps, but I found these worked quite nicely for me. Although perhaps I was wrong to apply my crochet logic (use the size that minimises gaping), but should have instead gone up a size or two. Might have made the knitting lacier. Don’t know if I’d have liked it, though. This one, I’m quite happy with.
The beginning was quite fiddly. I wasn’t sure I hadn’t twisted the stitches, not in joining, but in knitting the rounds. In such fine thread, it’s difficult to make out what you’ve done or which side you’re on. On the group the advice (after I’d finished) was to use a pillow to support the needles until you stabilise. Might try that the next time. Yes, I do hope there will be a next time! Knitting lace with yarn is frightening, but not so much with thread. Itty-bitty thread, I’m used to.
Pattern: Flacon from Yarnover.net. Here is my Ravelry project page.
Time: Two days
Size: 8″
Extra #1 Finished with crochet loops, and I wasn’t too sure I was doing the binding off (between the knit and the crochet rounds) correctly, but it doesn’t look odd. The pattern doesn’t specify how you insert your needle when you are crocheting three knit stitches together, so I just did what was convenient. I suppose I could have looked it up, but I wanted to finish. 🙂
#2 The knit fabric doesn’t give much opportunity for hiding ends, unlike crochet. I had to think a bit for this.
#3 I broke a personal barrier with this one!
#4 The knit band was unusual for me because unlike in a crochet doily where you have to increase the number of stitches each round to prevent puckering, these 6 rounds had the same number of stitches throughout. Apparently because of the height of knit stitches is much less than that of crochet ones.
I met someone on the Georgette Heyer mailing list who mentioned that she crochets. I couldn’t stop myself, and wrote to her, asking her how and what. She sent me this photo of a debutante dress she made for her daughter. I thought it was amazing, and had to share with you:

She made it with double knit cotton and most amazingly, made up the pattern herself. I thought it was lovely. Don’t you? Clare lives in Ireland.
After a long self-imposed gap, I got tempted again by one of Kathy’s designs and begged to be allowed to test for her. I used some ‘silk’ thread and a Pony handled hook to produce this:

Here are the details:
Yarn: ‘Silk’ on cones, about #10 or so, I think. I used two separate cones to make this, starting the new cone at the beginning of the second half, because what was left on the first wouldn’t have been enough and I didn’t want to have ends to weave in. Ironically, both cones had knots in them so I had ends to weave anyway. Even after the edging, I have thread left over on the cones. Sigh. Not a colour I’d choose for clothing, but then I felt the need to break out. Here is my Ravelry page for the project (not that it’ll tell you much more).
Hook: Pony handled 1.00mm
Pattern: Gypsy Queen (Ravelry link) by Katchkan
Time: About two weeks
Size: 19″ x 30″ (too big for our coffee table width-wise). Might have to give it away.
Extra #1 No printer in Hyderabad, so I worked entirely from the Mac screen. no probs.
#2 My edges are always wonky in filet, no matter what I do in terms of increasing and decreasing 😦
#3 Happy to be testing again 🙂
—-
And here’s some more orange for you, from our grocery (‘fresh’) rations:


So I brought only the yarn for two WIPS with me (which are dozing, and so haven’t even found mention on Ravelry). And I was vituously telling myself that I wouldn’t buy any more. Well, guess what! I did! But I had an excuse. I truly did.
A very good friend told me when I rang him up to wish him for his birthday that he’d had a baby boy just two days previously. So of course I just had to make him something. I haven’t got any of my pattern books and patterns aren’t something you can just snatch up at your neighbourhood store here. But I’ve got a good amount on my Mac, so I trolled through them and came up with this one. What appealed most was that it’s made in one piece up to the armholes. Please ignore the fuzziness of the pictures.
The details follow.

Yarn: Local unbranded acrylic in hanks, a bluey-grey colour not showing properly in the picture. I trusted the word of the salesman on the amount to buy and got 330gms. Some is left (about a third), but then I skipped making sleeves, so that might have something to do with it. I’m not complaining anyway.
Hook: Clover Soft Touch 2.5mm (C)
Pattern: Snail Cardigan, Hat and Booties from a pattern booklet by Bernat that I got for answering a survey. The booklet itself only has this one and a knit pattern (both with blankets).
Time: About a week, I think. Been very lazy! Mostly reading and lazing around.
Size: About baby size (haven’t measured it)
Extra #1 I made a mistake about halfway up, when I did 6 rows before the waffling rather than 4, but it isn’t too glaring, so naturally I didn’t frog.
#2 Left off the sleeves.
#3 Changed the button band to two rows of plain sc and one row of slip stitch. Did the same thing on the armholes.
I also found that when it got to point of neck shaping for the left front, I was supposed to be on the wrong side (RS or WS, I forget which), so the pattern tells you to cut and rejoin. Instead I was on the correct side, as it happened, so I just continued. I don’t know how it happened, except maybe because of the error I made? But it oughtn’t to matter, because I added 2 rows, not 1. Anyhow, I’m not brooding on it much.
If you Ravel, here’s my project page.
Now I’m testing a pattern for Kathy, because I wanted to do some delicate thread work and was seriously tempted by her latest design.

This is another case of “I’m out of thread, I’m calling this done”.
To quote verbatim from my Ravelry notes on this project:
“Ran out of yarn at the 16th row, so mine has become an 8-point star instead of a nosegay. No problem. There were what appeared to be errata in the pattern, but I couldn’t figure out if perhaps I wasn’t paying enough attention. Anyway, these are the modifications I made in the later rounds (I forgot to note them down for the earlier ones).
Rnd 11: Sl St in next 4 dc…..skip 10 dc….skip 10 dc, dc in next dc…
Rnd 14: Sl St in next 5 dc….*skip 5 dc, dc in next 2 dc….skip 5 dc, dc in next 11 dc….
Rnd 15: ….*skip 2 dc,….skip 2 dc, dc in next 9 dc….
I only worked 16 rows. The pattern is very dense and at the beginning it said “work in back loop only” so I worked all my stitches in the back loop, which made it doubly tedious.”
I seriously don’t know whether I was sleeping or what, but the first few rows seemed to be quite error-ridden, needing a fair amount of fudging from me. So did the latter rows, as you can see. Also, I ran out of the thread (so what else is new) so I quit at Row 16. Here are the details in the established format.
Thread: Schoeller + Stahl Manuela Häkelgarn No. 20, 1 full ball
Hook: Pony (with handle) 1.0mm
Pattern: Nosegay doily from Celt’s Vintage Crochet, rounds 1-16
Time: Way too long
Size: 15″
Extra As you can see from the picture of the actual doily, the look is totally different. But I’m not complaining. I don’t know how the recipient will react, though.

A certain someone sent me some lovely cotton yarn a few months ago, which I’ve been afraid to use (I’m petrified of using good yarn, and hate cutting it! There must be a name for this phobia…). But I got my hands on a copy of One Skein (thanks to another friend) and found this project in it, just right as I’ve been searching for something nice to make for a colleague’s new baby (the husband’s colleague, not mine). In our weather, warm clothing isn’t required, so I thought a bib might be more useful. The pattern went by very fast, but here are the tech specs:
Yarn: Schachenmayr Nomotta Catania Color (whew!) in 226 (how romantic), about half a skein
Needles: Metal 3.25mm
Pattern: Petal Bib from One Skein (mind the corrections)
Time: 3-4 hours (more for finishing than the knitting itself, see below)
Size: 4.5″ x 8″
Extra #1 Very cute pattern, but omg, the number of ends to be woven in for such a small project! Each of the petals is begun separately and then all are attached and knitted together. About 14 ends in all. I finished the bib in about 90 minutes, but the weaving in took me two hours or more.
#2 My short rows came out beautifully, can’t spot where I wrapped the stitches, yay!
#2 My first time doing applied I-cord, and I’m very pleased with the result. See for yourself:

#4 Perhaps I could have arranged the petals better to get a more symmetric striping, but it’s okay.
#5 I suspect the recommended yarn has a larger gauge, so the finished size would be bigger.
#6 I might knit the project again if I can think of a way to do away with the ends. In such fine yarn, carrying along the ends while knitting isn’t an option, especially not in stockinette stitch.
Since a good bit of the yarn was left, I sought around for another pattern to knit, and didn’t find any likely bibs, but I did see one for a dishcloth, so I cast on and knit that instead.

Yarn: The Catania again
Needles: Metal 3.25 dpns
Pattern: Multidirectional dishcloth
Time: A couple of hours.
Size: 6.5″ square
Extra #1 Loved the pattern. Makes me want to knit the multidirectional scarf it’s inspired by, and I shall, too, when I have some appropriate striped yarn in enough quantity.
#2 Added straps by chaining a desired length, and then turning and hdc-ing (US) all the way back, hdc over the bib, chaining again and hdc back to the bib. Simple.
Even after all that, I still had a bit of the yarn left, so I cast on chained for a whimsical pattern that’s been on my mind for ages (it’s how I discovered the parent blog).

Yarn: More Catania!
Hook: 2.25mm Clover double-ended
Pattern: Solipsis from Redshirt Knitting
Time: An hour or so.
Size: Doesn’t matter!
Extra #1 I made mine in crochet, because I didn’t want to cast on 60 stitches…All over hdc (US).
#2 Great fun! I plan to use it for my stitch markers.
#3 those buttons were the only ones I could find 2 of and I was in a tearing hurry…
Now I’ve gotto run. Duty calls.
Heehee.
The Boteh scarf first. Neat design, neat outcome.

And the specs:
Yarn: Patons Kroy sock in Blazing Blue that Rosi sent me, 2 full skeins (mine have only 192 yds, not the 203 as currently advertised). I liked working with it, it felt nice and squishy.
Hook: Clover Takumi 4.00mm bamboo from Vicki
Pattern: Boteh scarf by Kathy Merrick, from Interweave Crochet Spring 2007
Time: 2 days (took longer because I had to redo the edging when I realised the spacing I was using would leave me short of yarn before I finished)
Size: 5″ x 96″
Extra #1 The pattern has errata, but if you just follow the chart, that shouldn’t be a problem at all.
#2 Boteh is supposed to mean a bouquet of leaves or something, but it reminds me of how we drew plaits as kids.
#3 This is meant as a surprise gift for someone.
#4 I did only 15 motifs overall, refer to yarn shortage. But it’s a very good size anyway. That’s the best part about scarves, I suppose!
#5 I hate these three words: Pick up evenly!!! I never seem to get the count right.
Now here’s the Beret:

Yarn: GGH Aspen, in pink (the website calls it mauve), one skein.
Needles: Denise #8, not strictly 5mm
Pattern: Rollin’ Beret by Woolly Wormhead (scroll down). Nice and quick and easy 😀 Somehow I chose to do it in the same colour a similar colour to the one that Ruth made hers in.
Time: Overnight
Size: 5″ x 96″
Extra #1 I have a doubt about the finished product (size-wise), but until this reaches its recipient, I am not voicing those. But otherwise, a good, satisfying knit 🙂
Here’s how much yarn I was left with after finishing the edging on the Boteh:

Cutting it very fine!
