
You are currently browsing the tag archive for the ‘Techniques’ tag.
Well not really, because my hands are on my phone. But yes. I don’t have my loom with me while waiting at a class. So I thought I’d blog instead.

What, another stall setup? You’ll ask. Not exactly. It was an audition for an upcoming event. This would be the biggest bestest event ever if it happened and I’d be having about 3″ of space for my stuff. But I’m not a hundred per cent sure yet, so watch this space.
However! That yellow thing you see is my last but one scarf. Woven on my Ashford Knitters Loom, with some loopy boucle yarn.

A customer wanted a textured stole like the one below but in a brighter colour. So I ordered this in three colours.

I had to think a little to work with the loopy yarn. Finally I had it. Having only a 7.5 dpi heddle and a 10 dpi, I used the loopy warp in every other slot of the 7.5, and the coordinating thin polyester thread alternating. When it came to threading the heddle, I used the thread in the heddle holes and the loopy yarn in the slots.
This resulted in an interesting texture, with much of the loopiness confined to the top surface and the thread on the bottom. Like so.

To the left is one side (top as I wove) and to the other is the bottom.
As you can see, the fringe is a bit of a challenge, both because of the two different warp textures, as well as because the loopy part of the boucle is not very stably attached to the core yarn, so it unravels and becomes unloopy. I finally just knotted the strands together in groups.
I’m happy to report that a friend bought this one almost as soon as it was off the loom.
The other miraculous part of this story is that I have the exact shades of the sewing thread to match the three colours of the boucle. This also happened with the actual shawl I wove for the person I bought the boucle for originally.
In a long chain of events, she saw the substitute yarn I bought for another order and asked me to use that instead, so I went ahead and ordered it, but underestimated how much I would need. And only discovered it when I began to warp with it.
Scrambling for ideas, I ended up using my scraps of a different yarn and came up with this.


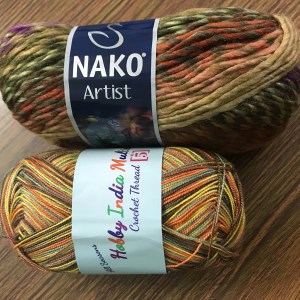
You can see where I changed yarns, from Nako Artist (the substitute) to Nako Vals (which was out of stock at the store but I had remnants from previous projects). The weft is black sewing thread.
This gave me a very rustic, thick yet loosely woven shawl and it thrills me no end that my customer (a different one!) loved it! Weaving was a challenge since the warp was a little dense and the unplied, singles nature of the Vals and the general fuzziness of the Artist (a wool blend) made making a clean shed difficult.
Sometimes serendipity is wonderful.
Coming back to the friend who I’d bought the Artist for, I discovered that Ganga Hobby India Multicolour had a shade (?) that coordinated perfectly.

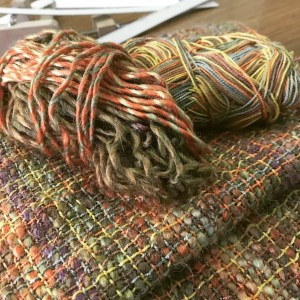

So again, this worked out well. Another rustic stole with interesting texture. I followed the same basic technique with the warp, using the wool blend in the slots, since I found it tends to stick together and resist separating to make a shed, and the smooth and thinner yarn in the holes. This one ended up more grid-like, and the wool bloomed to fill in spaces.
So there you have it. If you are still reading and didn’t throw up your hands at the confusion of it all, thank you for your persistence!
And yes, I’m finishing this blog post many hours later, since I wasn’t able to get it done before the class ended.
I’m easily bored and need to be entertained, like a child. New techniques, therefore, draw me in like moths to a flame.
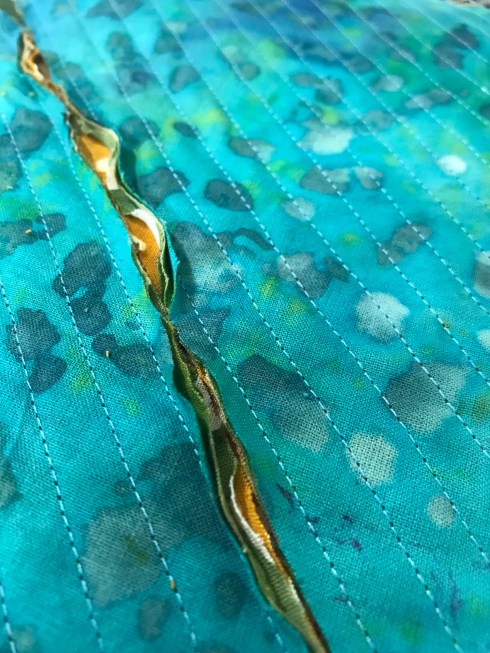
The most recent one I learnt is this one, for making chenille fabric. I had seen this earlier as well, but Debbie Shore released a video a few weeks ago that brought it back to my notice.
You choose several layers of fabric, sew them together at close intervals, and then snip through all but the bottom layer, between the lines of sewing.

With the natural tendency of the fabric to fray, this is how the final piece of fabric looks.

Then this goes into the wash to help in further deconstruction.
And there you have it! “Chenille” fabric.

Luckily for me, Debbie had a project to go with the technique, so I didn’t just produce a museum piece (which I have been known to do; these are termed “WIPs” or “UFOs”).
It took me a while, but I sewed this up into a proper pouch.

With a lining and all, too.
Tips for effectively sewing interesting chenille fabric:
- Choose fabrics that have enough contrast so that the layers that peek through are distinct from each other. Of course, you might choose the same colours if you’re looking for that low volume effect.
- This is a great way to use up scraps of fabric that you don’t like the print or colours of, because only a hint of those things is finally visible
- No need for further batting; there is enough bulk in the final chenille fabric to give you padding. This makes it an interesting technique to make baby quilts with. Then you’d only have to bind the edges.
- If you can get long narrow bladed scissors to snip through the layers, it reduces the tedium, although there is also a special tool available (Clover calls it the Slash Cutter and Olfa has one too).
- Patience. You need patience to sew the lines and patience to cut between them carefully. It can be tiring for your wrists and hands. I’m sure the tools I mentioned above will help with that.
So that’s a new sewing technique under my belt, thanks to Debbie Shore’s YouTube videos.
Do let me know if you also try out sewing your own chenille fabric.
I joined up to flash my stash on Instagram with Rin over at Sew in Love for fourteen days. I admit it was tough choosing what to show sometimes, but it was a useful exercise, showing me how scared I am to use some of the fabric I have. You can check out all the stash that was shown over at that first link.
After having the discipline enforced of at least one photo a day, I needed some other impetus so I wouldn’t go into withdrawal. I decided to join in the Modern HST Sampler hosted by Alice Blyth. This is discipline of much more severity. Try as I might, I am not able to get the sizes right. I can get the points to point correctly, but the dimensions…
My quilting guru discouraged me from cutting larger pieces of fabric so I’d have more freedom to trim down. She’s right, but you know me, I’m the shortcut seeker(c). So I confess to having added a 1/4″ or so in a few of the blocks. More room to manoeuvre. If I were a proper student, I’d be studying the geometry thoroughly so I’d get it and not have to refer to pattern measurements.
I’ve done 6 of the 14 blocks released so far, and hope to catch up with all by mid-month, so that I can then begin the next Instagram/Bloglovin’ inspired QAL (quilt-a-long). This one’s even more ambitious, because it has 100 6″ blocks. (That’s like trying to weave with 60/2 or 120/2 yarn, which I haven’t come close to, yet.)
You can see the Modern HST blocks as they happen on my Instagram feed, but here’s a collage anyway.
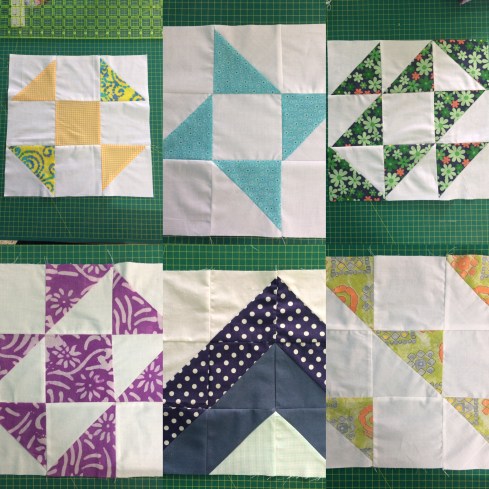
From top left: Candy, Ninja, Lantern, Stepping Stones, Mountain and Formation. All from scraps. There’s no colour scheme at all, and I’m hoping the white will pull it all together. The one thing that I’m doing is to adhere broadly to the colours used by the designers.
From here on in it will only get tougher, since the HSTs are smaller. The margin for error is much less.

Two weeks ago, we wrote a complaint that the washbasin in our bathroom was shaky. So two guys came (Malayalam only) and dismantled the whole thing, leaving the washbasin in the fire escape and the only word I understood was “nala” meaning tomorrow. Well, the tomorrow only came after a week or so, when 4 (!!!) men showed up to “put in a flug”.
Having given up on anybody ever replacing the washbasin, it took me a minute to understand that they’d come to do something about it. I let them in, they carved out a hole in the wall, put in some cement and a wooden flug (now you get it!) and went away, asking me to water it twice a day and Monday (yesterday) they’d come and put the washbasin back up.
I’ve been faithfully watering the flug, but alas, no one has come to complete the task. And so we roll.
In knitting news, I’ve been working on this pattern, which caught my eye. I’m using Lion cotton and Sugar n’ Cream. Although the designer’s work looks scrumptious, mine is definitely going to end as an Ugh. The problem might be that (a) I knit too tight therefore my floats are too tight, thus not giving that gingham look, (b) cotton isn’t slippery enough for the pattern (c) general shabby knitting.
Also, the handle is done in double knitting in two colours, which has me completely floored, me never having done double knitting in colours before. I’ve tried checking out the videos available online, but I wish someone would explain this particular pattern to me. I’ve finished the body of the towel and it only needs a handle now. There is a chart, but I’m not able to understand that very well. 😦
As you can see in the photo, it is still raining here. Apparently Kerala (and much of India) has had 20% excess rainfall this monsoon. Somebody forgot to tell the southwest monsoon that it must retreat before the northeast monsoon comes calling. We went on a cruise of the backwaters on Sunday, taking around the husband’s superior and family. That isn’t our boat, although ours looked identical. They do you for lunch. The boats have two bedrooms with attached bathrooms. You can hire them for the night as well. Food is traditional Kerala cuisine. The backwaters are used as the main media of transport in the region, and it was startling to see distance signboards we normally spot on highways. All in all, a unique experience.
Me, I’m a dry land creature, and while the life on so much water is fascinating to study and brood over, I much prefer less moisture. Water scares me. Nice for a break, though.
ETA: The designer is holding my hand while I attempt the handle. Progress shall be reported.
Thank you everyone for your responses so far on my sappy (soppy? sloppy?) question in my last post. Let me be clear, I am not at all the sort of person to keep it all in, as those who have known me for any length of time will testify. Rather the opposite, frequently latching on to unsuspecting passersby to upchuck all my current troubles. Oops.
But sometimes no one is handy, or you feel you need to give your current recipient a break. Or sometimes it just feels as though things are the same, although troublesome. Then I feel like I need a Scream Room™. Do you have one? Or any personal space where you know you won’t be disturbed (intruded upon)? Let me know.
Meanwhile, here is a bag I rescued from UFO-dom and finished to send off to my Crochetville Notions Swap partner. This picture was taken with my last bookhaul in it. Amazingly, both of us have received our packages intact and promptly. Only, mine has gone to Hyderabad in anticipation of our moving from here. So no pics.
And guess what? The husband’s transfer has been deferred indefinitely for two months. The boss at the other place, who was on leave until a couple of days ago, returned to office and realised he’d lose his deputy if the transfer went through (the husband is too junior to fill that particular position). So they’ve asked for a postponement of the move until they figure out what to do about a deputy. Ha. Suspended animation. It’s nice, have you ever tried it? Anyhow, I present to you, The Frugal Bag.

This was a pattern from Frugalhaus.com, but I can’t find it there now. Googling produced a pdf link whose legality I’m not confident of.* Since I forgot to measure this before sending it off in the Crochetville Notions Swap, let’s get the details in an ugly format. The yarn was GUM and unknown (probably RHSS) purple, with Denise 10 1/2 circulars. I started this bag so long ago, I don’t even remember when. Some time last year. Nice and sturdy. For the bottom, instead of using the garter stitch recommended, I used linked dcs (US) (this link shows a linked treble (US) but the principle is the same). Also try this Crochet Me tutorial. The stitch produces fewer holes than simple dc (US).
You could use either of the bag’s sides (inside or out) and in fact the stockinette side looked interesting, like fairisle or something. However, the purl ridges defining the sides weren’t clear enough so I turned it this side out (according to the original pattern). And now the sides of the bag are well-defined. Ugly but functional. That’s me 😀
* ETA: Heather very nicely found me the link to the pattern from archive.org. Thank you, Heather!

I went looking for an embroidery frame at a craft shop and I struck it lucky, finding these bamboo bag handles. The upper ones were Rs 50 a pair (about a $1.10) and the lower ones were Rs 40 a pair (about $.90). Now all I have to do is make some bags. But you know, I prefer my bags to be shoulder ones, so that my hands are free. Time was, all my trousers had pockets so my wallet could be in them and my keys, and I could swing my arms freely around. Alas, now all my trousers are pocketless and I am laden with a handbag with my cell phone, keys, wallet, pens and things. Sigh.
Now I want you to cast your mind back to when you were younger, the world was friendlier and everyone loved everyone else. Remember the last time I showed you some respectable crochet? It could be this or this, neither of which were truly respectable, actually. Anyhow, I am now showing you some work in progress:

This is a baby blanket using the Offset Shells stitch pattern from one of my Harmony Guides. I seem to remember Cordelia told me the yarn is Lionbrand Woolease (she sent it to me via my uncle in Houston whom my sister visited on her way back from Hawaii). The skeins are label-less, so I haven’t a clue what colour it is supposed to be. It’s about 40 inches wide and I’m close to the end of the second skein, with one more left to go. I shall make this as big as it gets and then pop it off in the mail to one of two friends with small children. There’s another one being made, also from a Harmony Guides stitch pattern and it’s a bit er, unorthodox, shall we say? I haven’t got a picture of it yet, but I shall soon.
I am happy to report I successfully used the Russian join on this one which leaves me with two less ends to weave. I’m not quite sure how exactly to manipulate the yarns when you’re trying to join two different coloured ones, though, so as to get the join exactly at the stitch you want it.
In happy book news, a branch of Crossword has opened in this town and it’s walking distance from my house. I visited it the first day and bought Pico Iyer‘s Falling off the Map. I’ve never read him before.
But currently I am reading Alan Clark‘s (colourful chap) Diaries and it’s an interesting experience. I bought it at a discarded books sale at the British Council Library in Hyderabad, along with a bunch of Reginald Hills that I haven’t blogged about. My sister has a deep fascination with Maggie Thatcher and this book has several insights. And I’m learning things I never thought could be true outside books about how British politics work. Also Clark met George Courtauld (Travels of a Fat Bulldog) at an airport in Latin America. Now I want to go back and see if Courtauld refers to the meeting. Except I don’t know where to look for the book. I think my sister had borrowed it from the BCL on one of my Hyd trips. Sometimes it all sounds like Alice in Wonderland. Things like the Queen’s Messengers, and tea parties are actually true!
One of my favourite pieces of dialogue in Alice:
“Whose job is it to answer the door?” (Alice)
“Why, what questions has it been asking?” (the footman, I think).
Oh, and I bought a so-called bamboo cotton sari the other day at a craft fair from a persuasive Jaipuri salesman. I wonder how authentic it is. It qualifies as a party sari (for naval parties where Kanchi and Venkatagiri would be too aunty-like). Don’t know how long it will last. All glamour and glitter.
This is how I feel:

because the major knitting project I’m working on now is a baby blanket in Lion Brand cotton for a baby who will be living in Chennai. I *absolutely* have to make something for the baby, so I’m hoping this will be a good thing. I cannot see it wearing any sort of warm clothes ever. Even knitting with this sort of cotton makes me feel it would be too heavy. Maybe I can try making some wearables with some double-stranded thread or something. Hmm. Interesting thought. But I digress.
The pattern is mindless enough (a glorified dishcloth, really) and I was whizzing away in the beginning. Now I’ve hit the widest section (still getting wider) and man, is it slow-going! 😦
Here’s what I’ve done so far:

Not very informative, but it’s about 29″ each side. I have to get to 36″ for a decent size and it looks like never happening.
Also, I’m on my second skein and fast depleting. There is only one more skein left, which most probably will not be enough to complete the thing.
Two positive things, though. The Denise #7s are working through the yarn like butter through a knife er, a knife through butter. Smoooooooooooooth. And I really enjoy having the freedom to increase the length of the cable at will. I wouldn’t have been able to do this one on my local cable needles.
The other thing is this:

See those eyelets? Those are the kind of eyelets I was supposed to have on my Eyelet Border Facecloth but didn’t. The secret of my success this time was doing my yarnovers differently. Yes, as simple as that.
You see, I knit with the yarn in my right hand, throwing it under and around the right hand needle (makes me English or something, blimey!) to make my knit stitch; but! throwing it over and around the right hand needle for a yarnover. No idea why I do this, but this effectively made my eyelets disappear. For some reason, I decided to follow the same movement for yarnovers that I do for my knit stitch in this pattern, and voila! I have an eyelet. Epiphany.
Actually I think this might have happened because I’m also working on this pattern, where the instructions say yfwd instead of yo, but the effect is the same. Whodathunkit?
(Yes, I know it’s a bit blingy, but I recently was given two skeins of some eyelash that was begging to be knit).
(And yes, I am not very snobbish about novelty yarns, I’m afraid.) 😛
Question: How many inches of I-cord does it take to poke a hole through your left index finger with a 3 mm dpn?
Answer: Definitely less than the 45" required for the Self-lined bag I've almost finished knitting. Right now all we have is a small white blister after 4". I could use my handy French knitter (aka knitting knobby) but I wanted to prove I could knit an I-cord. The only change from the pattern I've made is to change to dpns from my circular. That means coming down to 3.00 mm from the 3.75 mm, but I have to use what I have. I only have 2 mm and 3 mm dpns.
Lesson 2 of Tunisian Crochet:
Choose a light colour to work with.
Lesson 1 in Tunisian Crochet:
Make the starting chain l o o s e .
