
You are currently browsing the tag archive for the ‘Accessories’ tag.


All pictures are clickable for the curious.
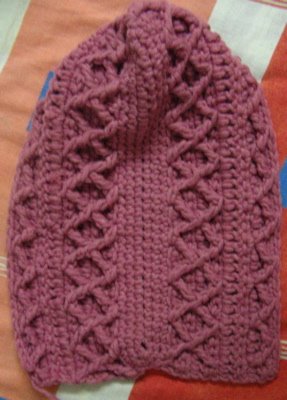
Yes, I have another finished object to show today.
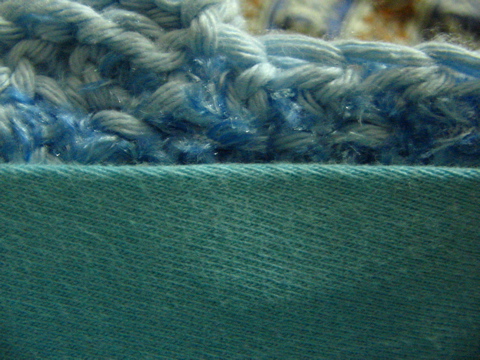
That is fusible fabric fused to an old cut-up t-shirt, in turn fabric-glued to my work.

That is how it looks inside. Fairly true to the real colour.

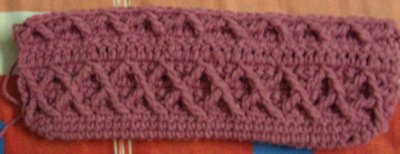
That is my first-ever successful use of Tunisian (knit) stitch (link leads to Nexstitch.com’s video instructions). I used the same regular hook, because this strap is only 5 stitches across. I love how the cotton blend yarn gives a perfect definition to the knit stitch.

This is the button closure. Larger than life button, but I like it. It makes a statement, don’t you think?

Yes, that’s my hand 🙂 By now discerning (and patient) readers would have gathered that this is yet another bag. So I present proudly:

Ta-da!!!!!! I’m proud of myself for several reasons, including fusible fabric, bling-y button, made-up pattern (ok it’s quite elementary, but still!), Tunisian stitch…
Er-urm. Here’s the details:
Yarn: Aunt Lydia’s Baby Denim and Vardhman Feather Fresh
Hook: Pony 4.5 mm
Pattern: All my very own!!!!!
Time: Over two days
Size: 8.5″ x 6.5″(straps are about 9″ high)
Extra: #1 Where do I begin?! Ok, I successfully used the Tunisian knit stitch (link leads to ARNie’s written instructions) for the first time ever for the straps
#2 Love the definition the cotton yarn gives, and since the base was already anchored to the purse, the Tunisian part did not curl.
#3 My first time using fusible lining. I bought a metre of the fabric used for collars and cuffs. I was wondering if it might make it too stiff, but it’s fine.
#4 Cut up an old t-shirt (doesn’t match exactly, but that’s ok)
#5 There’s bling in them thar button
#6 Posting about it is successfully distracting me from the terror in Bombay. 😦
Well, I can’t think of a more imaginative title! Some time in February, I won a contest on Amie’s blog, and the prize was any one of her patterns. I chose the Shelly Shopper. And today I finished it. It’s actually a very fast and easy pattern, and the way it is presented is wonderful, with full colour pictures of the stitches and how they are done, and Amie adds a printer-friendly version of the pattern as well in the same file.

I used a different yarn than called for (well, obviously!) and it turned out smaller and wider. Am still wondering if I should line it…it has holes. I have an idea which might ruin it forever…I have some of the fusible fabric used for cuffs and collars and want to try it for lining. It will be rather stiff, but well, anything to avoid sewing! Anyway, here are the specs:
Yarn: Aunt Lydia’s Baby Denim
Hook: Pony 4.5 mm (is that a G? I’m too lazy to find a list now)
Pattern: Shelly Shopper from Nexstitch.com
Time: Each side took only about an hour or so
Size: 9″ x 10″
Extra: #1 Planning to line it like a collar!!!
#2 Used plastic handles for the first time ever. Those and one more are the only choice available. I’ll show you the others some time.
#3 Perhaps using the yarn and hook called for in the pattern would have reduced the holey-ness, but I’d never have made it then, would I?! (say that with a lilt a la Eliza Doolittle)
#4 The husband thinks the original looks much better, but that’s ok. I’m happy with it so far (who know what will happen after I line it?)

No muppets were harmed in making this bag. I doubt anyone will remember, but I started this bag back in February and had an issue with the pattern. Anyhow for the second side I went with plain stockinette and found it produced stripes. I didn’t go with a belt handle, but chose instead to crochet one with some Moda Dea Ticker Tape that I got in my April CAT PAC from Kathleen. The idea was given to me by Skip in our last CAT chat. Thanks, Skip!
I’ve given the bag away to my neighbour’s daughter. It is a bit frivolous for me at my age 😛 Anyway, I believe her brother now wants one for a gift for a friend. This time I might stockinette the whole thing without a pattern. Maybe even on circulars, to eliminate the pain of sewing seams.
Here are the gory details:
Yarn: Vardhman Fun Feather 50g skeins (2), Small amount of Moda Dea Ticker Tape
Needles & Hook: Size 7/4.5 mm straights, Boye size J/10/6 mm
Pattern: Loosely based on this
Time: 5 months?!
Size: I didn’t actually measure it but it might be about 8″ across and about 5″ deep.
Extra: I might actually sell something like this, wow!
No bloodshed here (not yet anyway). I'm going in circles! Finally I'm doing something with one of the two circular needles (pairs?) I have.
I thought both were the same gauge, but one is 3.75 mm and the other is 3.25 mm, same length, though, 80 cm. Pony of course.
The beginning of the pattern has you doing a flat piece on the circs and being the novice that I am, I debated and googled and generally fretted for hours (aren't you supposed to have stockinette st when you use circular needles? Does this end go in this hand or the other? Can't I enlarge the pattern photo more to see if the bottom is maybe a garter st bottom?)
before deciding that when the pattern said:
Knit every row
it meant, quite surprisingly, to knit every row. So I got my flat piece of 30 garter stitch rows:
Then came the terrible struggle to pick up and knit sts along all the other 3 sides, but I did. Then a bit of research on the Magic Loop method (because of course the needle is longer than called for in the pattern) and a brash assumption that I understood what I needed to do, and here we go:

Except for my epic struggles involving strange muscles in my wrists and calluses on my left fingertip, there is nothing outstanding about this pattern at all. A nice ordinary (think Rex Harrison in My Fair Lady) pattern, the prime attraction of which was that it proclaimed itself "self-lined". (Imagine, no fiddly sewing needles and thread and ghosts of unfinished bags hanging over me).
The pattern link is here. (You might have to sign in/log on/register, I'm afraid).
Yes, the pattern calls for a 4.5 mm circular needle, but you see my problem? I don't have any!
Here is what I tried with the ggh Aspen. First the pattern is very poorly written, and then the yarn is too chunky for this, I think.
I spent hours googling for an explanation of the honeycomb stitch, not very successfully. Then I found it in my Harmony Guide, but I needed the diagram to understand what to do. In any event, I found I'd soon run out of yarn if I attempted to go any further on this, so it's waiting to be frogged.
Naaah. This yarn is still in search of a good pattern to be shown off, and something tells me it might be knit. This bit took an entire skein!
Remember the fun-furry yarns that J had sent me from Lucknow? Well, both have been needled. One is yet a UFO, but the blue feather type got made into this mini scarf for my poor neglected SP. It feels really soft. Knit in garter stitch throughout on straights.

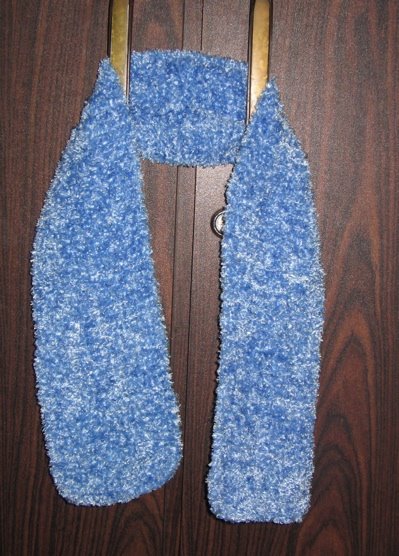
Yarn: Vardhman funfur-ry 1 50gm ball
Hook: Size 7 (UK?) 4.50mm straights
Pattern: Garter stitch, 24 sts wide
Time: Overnight
Size: About 36" long and 5" wide
Extra: Knitting is best for fur-type yarns. The simplicity of the garter stitch shows the texture well.
On a closer look, the yarn looks like something to do with chickens…
Remember the SWIP I talked about long long ago when we were all young and innocent? Well, it has graduated now from being a SWIP to an NLSWIP (No Longer a Secret Work in Progress) or an OFO (Open Finished Object). Three cheers for me!
Here it is in part of its glory (it was too long for me to photograph in one frame horizontally without employing a step ladder and/or stilts).

So now you know, it is a Lacy Knit Scarf (or maybe a Stole? We're not particular here) in what is probably 100% acrylic, but very soft mango-y yellow, and it is going to be sent to a friend. I'm thrilled to bits for several reasons:
1. It's knit! (as in, not crocheted!)
2. It's lacy knit!
3. It's lacy knit without a written pattern and from a chart!
4. It's lacy knit from a chart I manipulated in order to get it to the width I wanted!
5. Yippee!
6. It's knit! (as in, It's done!)
And so forth.
Here is how it might look on a person…

…if the said person has shoulders about a foot wide and does not rise more than 3 feet above the ground. Now, I think the recipient is definitely not these proportions, but I'm sure I shall be forgiven for my first attempt at such a project. We shall see. Anyhow, here are the tech specs:
Yarn: Unknown acrylic in mango-y yellow
Hook: Size 7 (UK?) 4.50mm straights
Pattern: Made up my very own! (Yippee!)
Time: Aeons
Size: About 60" long and 10" wide
Extra: #Look at points 1-6 above
Nobody will please mention the trifling errors I made or the weird proportions. Or the fact that I probably yarn over all wrong. The thing is you see (all those with more important things to do may please leave now), I knit with the yarn in my right hand and for normal stitches I yarn over from under (clear as mud, aren't I). But for the lace-effect YOs, I tend to YO from over! Got that? Plus, according to the instructions in the book where I got the lace pattern from, I was supposed to do K1, P1 into the YO on the subsequent row. Being as I'd reversed the direction of my YO, I did P1, K1, since it was more convenient! So I think it's all wrong, but *shrug* it's got the look! And I sort of know how to use a chart to knit now. Yay!
And although it is acrylic, I did block it, on the sage advice of the scientific mind. The lace needed to be opened up.
Finally have an FO. Ok, it's only about 6" high, but it's done, nevertheless, and I used my hook and yarn and hands…
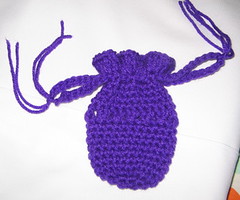
The pattern is by CroJulee at Crochetville.
Yarn: Red Heart Super Saver in purple (teensy amount only)
Hook: Pony Size 5.00mm
Pattern: Here
Time: 30 minutes (or less)
Size: 6"
Extra: #1 Sort of like a one-night stand, for instant gratification.
#2 Now I have to think what I could possibly put in this bag. Any suggestions, anyone?
There you are, knitting a bag with funfur. Why does it have to be complicated as follows:
1st row: (WS). With MC, K1. *yf. Sl1P. yb. K1. Rep from * to end of row.
2nd row: Purl.
3rd row: With A, K1. *K1. yf. Sl1P. yb. Rep from * to last 2 sts. K2.
Why all the Sl1Ps and things? Wouldn't plain ole' garter st do as well? The free pattern from Bernat uses the Disco yarn (yes that infamous giveaway yarn, which by the way, I never got despite giving 3 different addresses two separate times) in two colours, while I am substituting this yarn:
 Since this is already bi-coloured, I think I am missing the point somehow.
Will the scientific mind please tell me if it's to make sure the two colours blend, or just a scam to make you think you're making something complex? I'm inclined towards the latter, but maybe it's the former, and I am strongly tempted to swatch in two colours of a unfunfur yarn just to see how it matters.
While on the subject, I've read the pattern through several times, but am yet to understand
#1. How does knitting this pattern lead you to a purse which is halfway usable (may be related to the fact that it is funfur) (or that you start the handles at 5"…what sort of purse is only 5" deep?)
Anyhow, I needed a picot-less pattern, and pretty mindless, so I am feeding this monster knitting this anyway.
